The Hauppauge Capture application: Record, trim and upload your game play
- Record and stream your game play with in-game chat with our microphone mixing feature
- Simple and fast trim editor
- Built-in YouTube upload
- StreamEez for easy streaming with Twitch and YouTube
- Logo inserter (HD PVR 2 and Colossus 2 only)
See Hauppauge Capture in action!
Hauppauge Capture Features
- Record in HD from HDMI, component video or composite video sources
- Stream with Twitch and YouTube with the built-in StreamEez support for all Hauppauge recorders including the Rocket and HD PVR 60
- Multi-track audio recording. To turn on multi-track recording, click:
Advanced -> Audio encoder and select Use Multiple Audio tracks. Click OK and then close and reopen Hauppauge Capture.
Each of your audio sources will now be on a separate track, and can be edited in Sony Vegas. To check out the multi-track audio, we suggest you open your recording in the VLC media player and click on Audio -> Audio track and you can listen to track 1 (game), track 2 (microphone) or track 3 (PC audio). - Skipback: Skipback allows you to record in the past, with a setting for 1 to 1000 minutes
- Hauppauge Capture now has three recording formats: M2TS, MP4 and TS
- New function in Advanced: EDID option "HDMI Passthrough". This allows you to limit the resolution of your console to that supported by your TV, rather than the resolution supported by the HD PVR 2. This fixes problems with 720p TV's where you would not see the game console on the TV set but a good image in Hauppauge Capture.
- New feature: Record hotkey. Alt + space bar starts and stops recording
- F6 now launches the Webcam property page: adjust your webcam's image from the main Capture tab to see your adjustments in real time
- Updates to StreamEez, with improved preview
- Bug fixed with some webcams where there would be no video after enabling Facecam
- Adds microphone recording to Colossus
- Improved MP4 Export function
- Fixes an issue where the mute state could get swapped after closing the application
- Supports USB Microphones on HD PVR Rocket for recording (but not yet for streaming)
- Added Microphone delay page to Advanced Settings for Rocket
- Improved microphone delay slider, now supports +- 500 ms
- Fixed upload to YouTube and YouTube live steaming log-in problems
- Option to enable/disable 5.1 audio via HDMI is back
Hauppauge Capture Download
Hauppauge Capture version 43356
Für Windows 11, 10, 8, 7 | Datum: 21.12.2025 | Größe: 86 MB
Um die Software zu installieren:
- Klicken Sie auf den Download Button. Sie werden gefragt, ob die Datei ausgeführt oder gespeichert werden soll. Wählen Sie Speichern. Merken Sie sich den Speicherort.
- Stellen Sie sicher, dass die HD PVR (oder Rocket, Colossus 2, etc .) mit dem Computer verbunden ist. Die Software lässt sich nur installieren, wenn die Hardware angeschlossen ist.
- Nach dem Download führen Sie die Datei aus.
- Wenn die Installation beendet ist, werden Sie aufgefordert, Windows neu zu starten. Starten Sie den PC neu.
- Nach dem Neustart sehen Sie ein Hauppauge Capture Icon auf dem Windows Desktop. Doppelklicken Sie auf das Hauppauge Capture Icon. Wählen Sie die Registerkarte “Aufnehmen”.
Hinweiss:
- Die HD PVR 2 muss zurückgesetzt werden, damit die neue Firmware geladen werden kann. Trennen Sie dazu die USB-Verbindung und Netzteil und verbinden Sie beides wieder.
- Stellen Sie sicher, dass bei Quelle "HD PVR 2" (oder Rocket, Colossus 2, etc .) eingestellt ist.
- Wenn alle Kabel korrekt verbunden sind, sollten Sie in der Lage sein, Videos aufzuzeichnen.
Comments, questions on this version? Please e-mail us at: info@hauppauge.de
Streaming with YouTube Live
Video setup guide to YouTube Live
Click to play video
Live streaming guide from YouTube
Click here for instructions from YouTube
YouTube Live Quick Setup Guide
YouTube Live Streaming Quick Setup Guide fro StreamEez
YouTube Live video
Hauppauge Capture Kompatbilität
Hauppauge Capture unterstützt die folgenden Modelle:
- HD PVR 2 (alle Varianten)
- HD PVR Pro 60
- HD PVR 60
- HD PVR Rocket (alle Varianten)
- HD PVR model 1212 (1st Generation - alle Varianten)
- Colossus2 und Colossus (alle Varianten)
- USB-Live2 und Impact-VCBe
Lade Hauppauge Capture noch heute herunter!
Installation:
- Klicken Sie auf den Download Button und speichern Sie die Datei auf dem PC.
- Stellen Sie sicher, dass das HD PVR Gerät mit dem USB-Port des Computers verbunden ist.
- Nachdem der Download abgeschlossen ist, führen Sie die Datei per Doppelklick aus.
- If you see the message "Windows Protected Your PC, Windows Smartscreen prevented an unrecognized app ...", click 'More info' and 'Run anyway'. Windows Smartscreen is a new 'feature' in Windows 10 to prevent new updates from being installed automatically.
- Nach der Installation, werden Sie aufgefordert, Windows neu zu starten.
- Während der PC neu startet, entfernen Sie das USB-Kabel kurzzeitig und stecken es dann wieder ein. Dadurch wird das Gerät zurückgesetzt.
- Damit ist die Installation abgeschlossen.
Hauppauge Capture Gallerie
If you have any comments on the Hauppauge Capture application, please e-mail them to: TheFrontDesk@hauppauge.com
We'd appreciate hearing what you think!
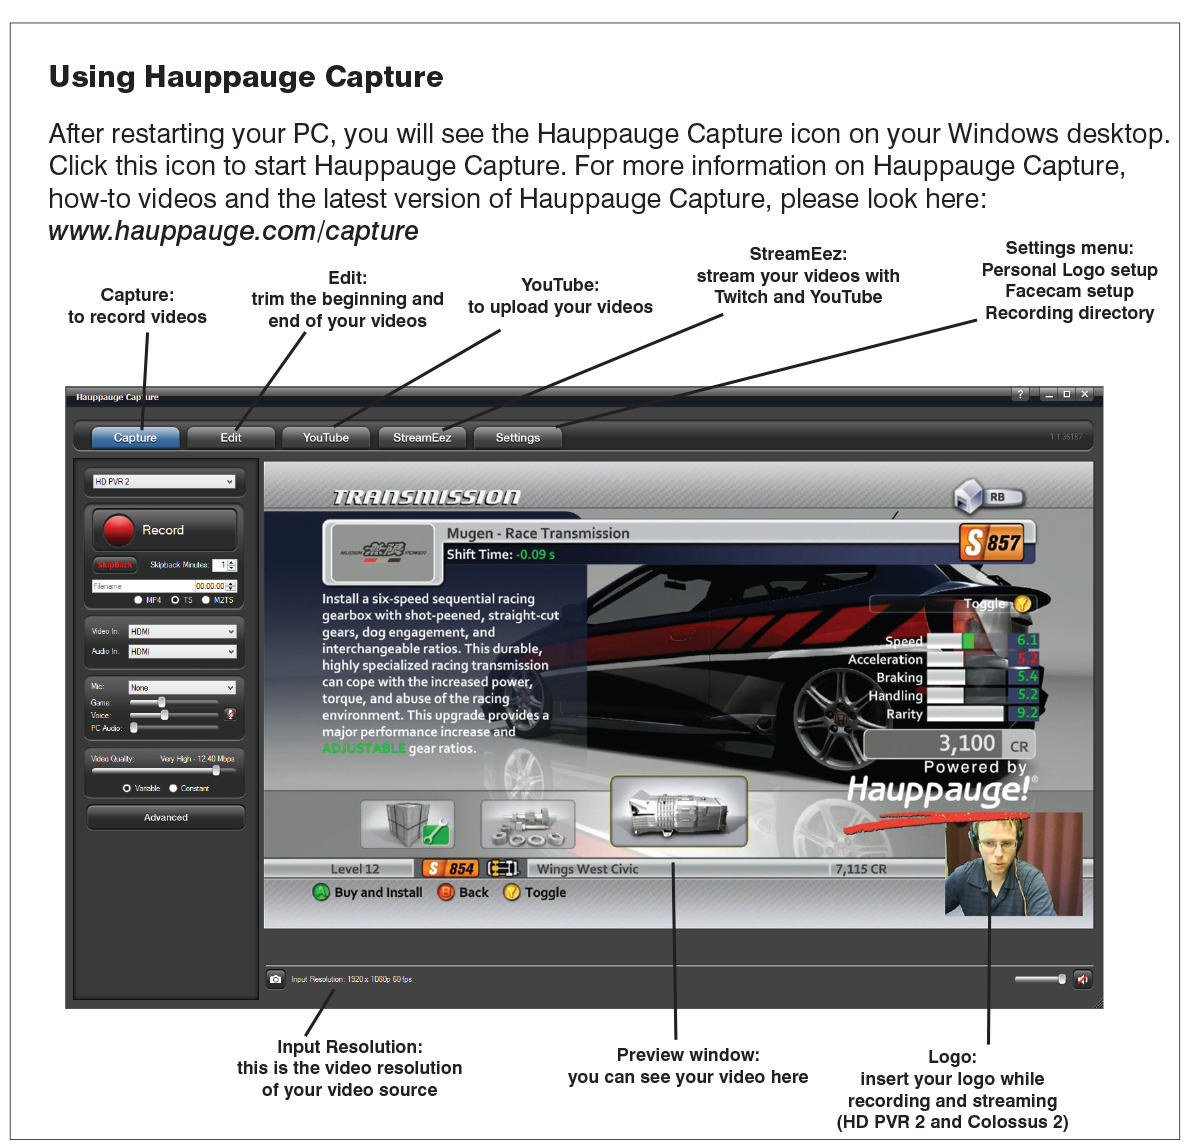
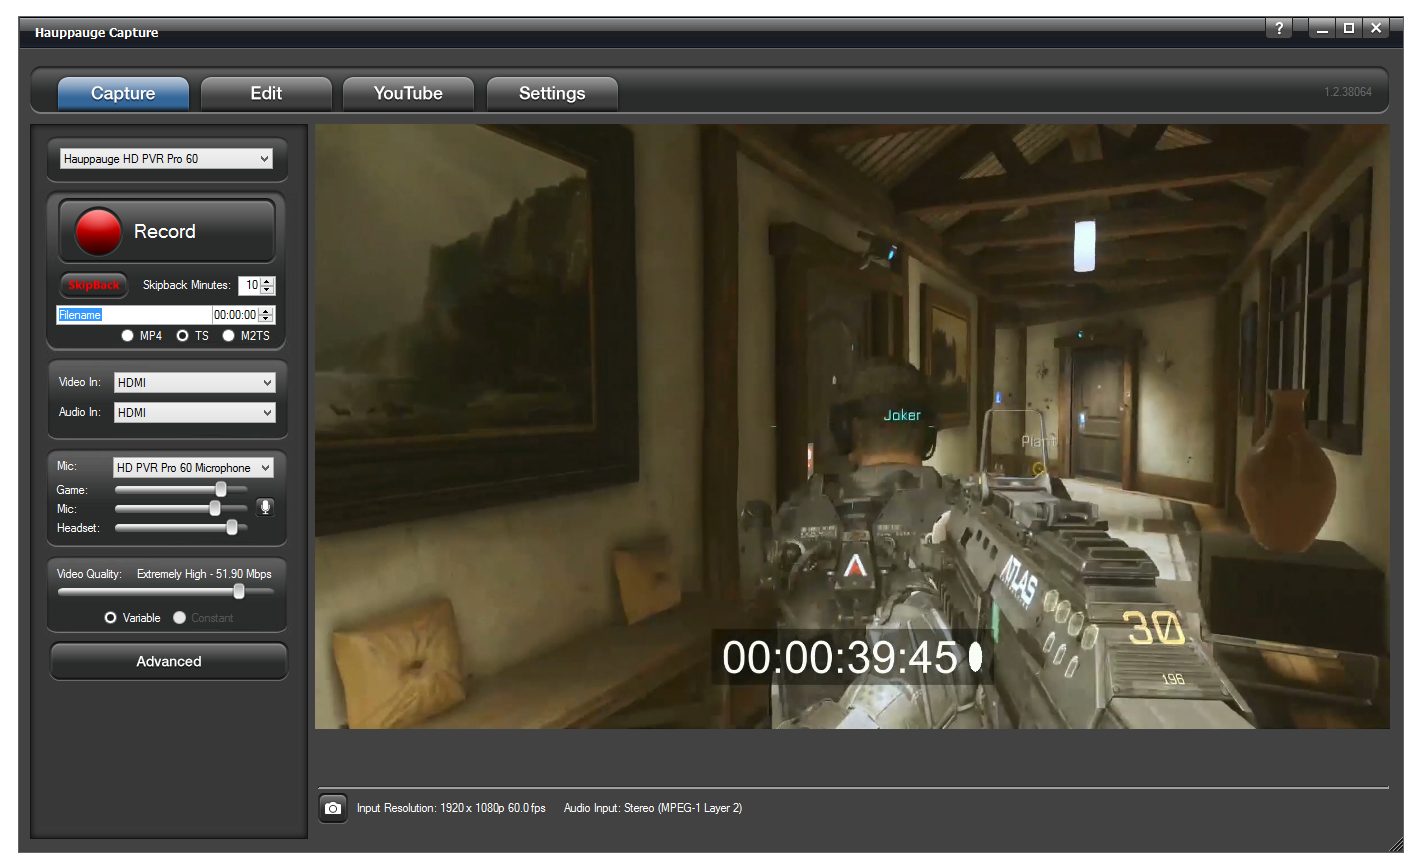
Hauppauge Capture Overview
click to enlarge
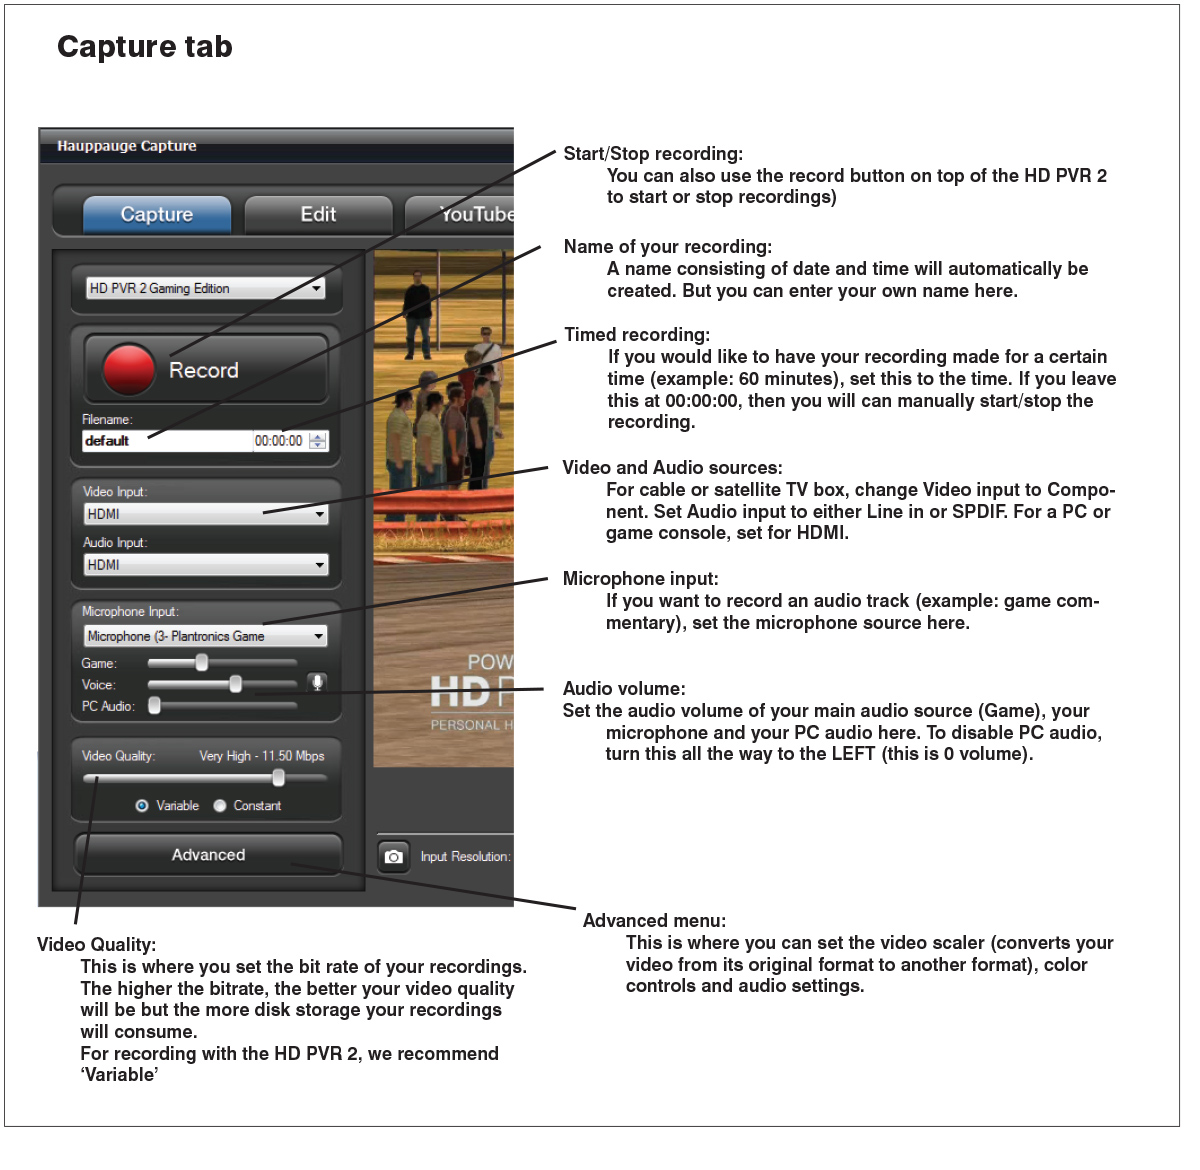
Hauppauge Capture Capture Tab
click to enlarge
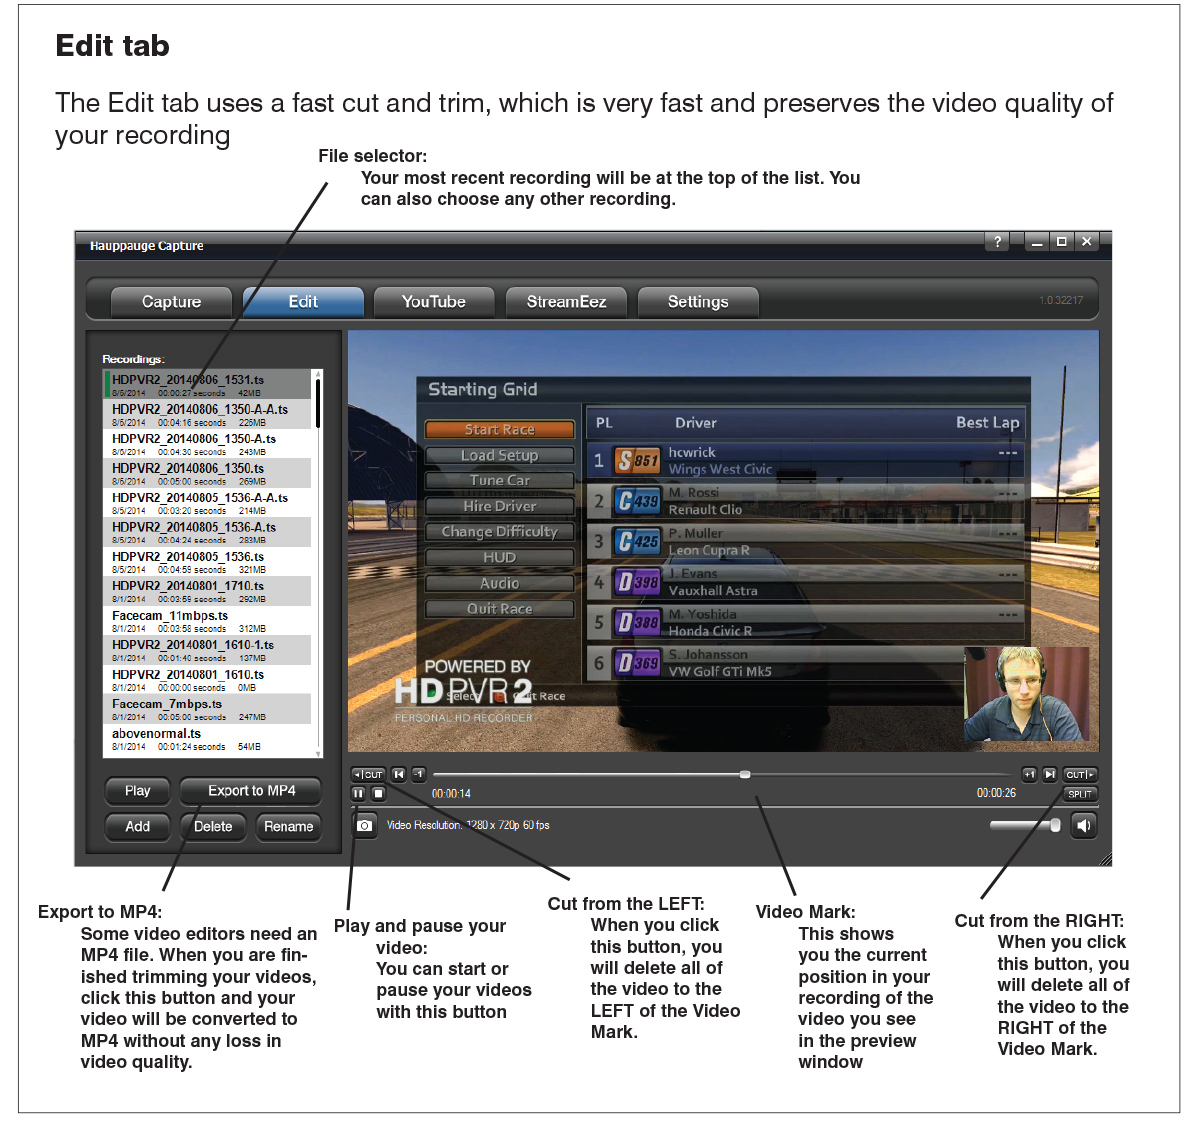
Hauppauge Capture Edit Tab
click to enlarge
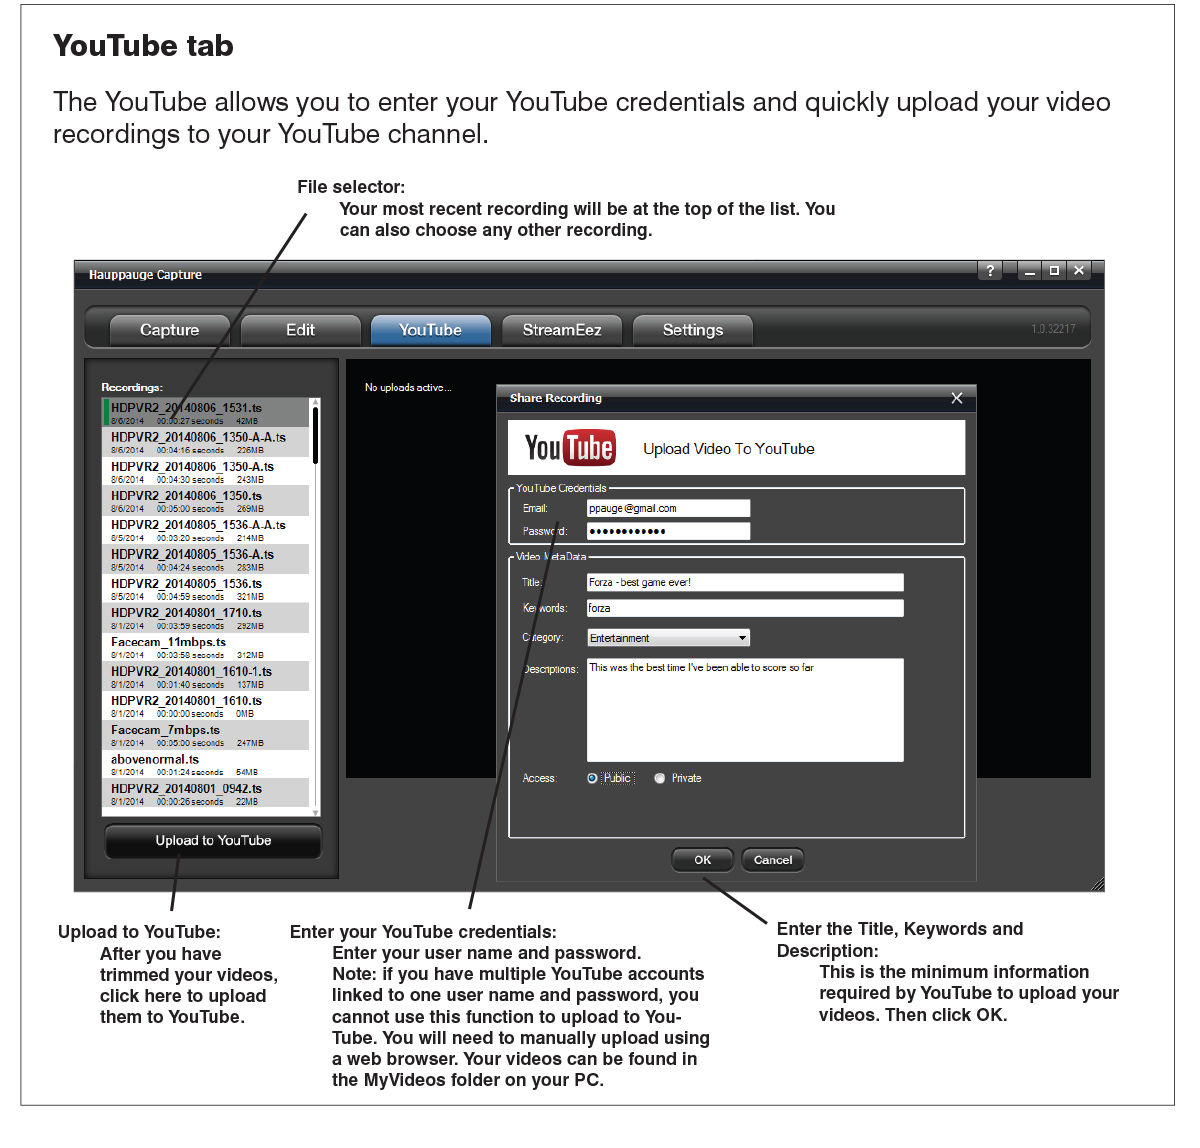
Hauppauge Capture YouTube Tab
click to enlarge
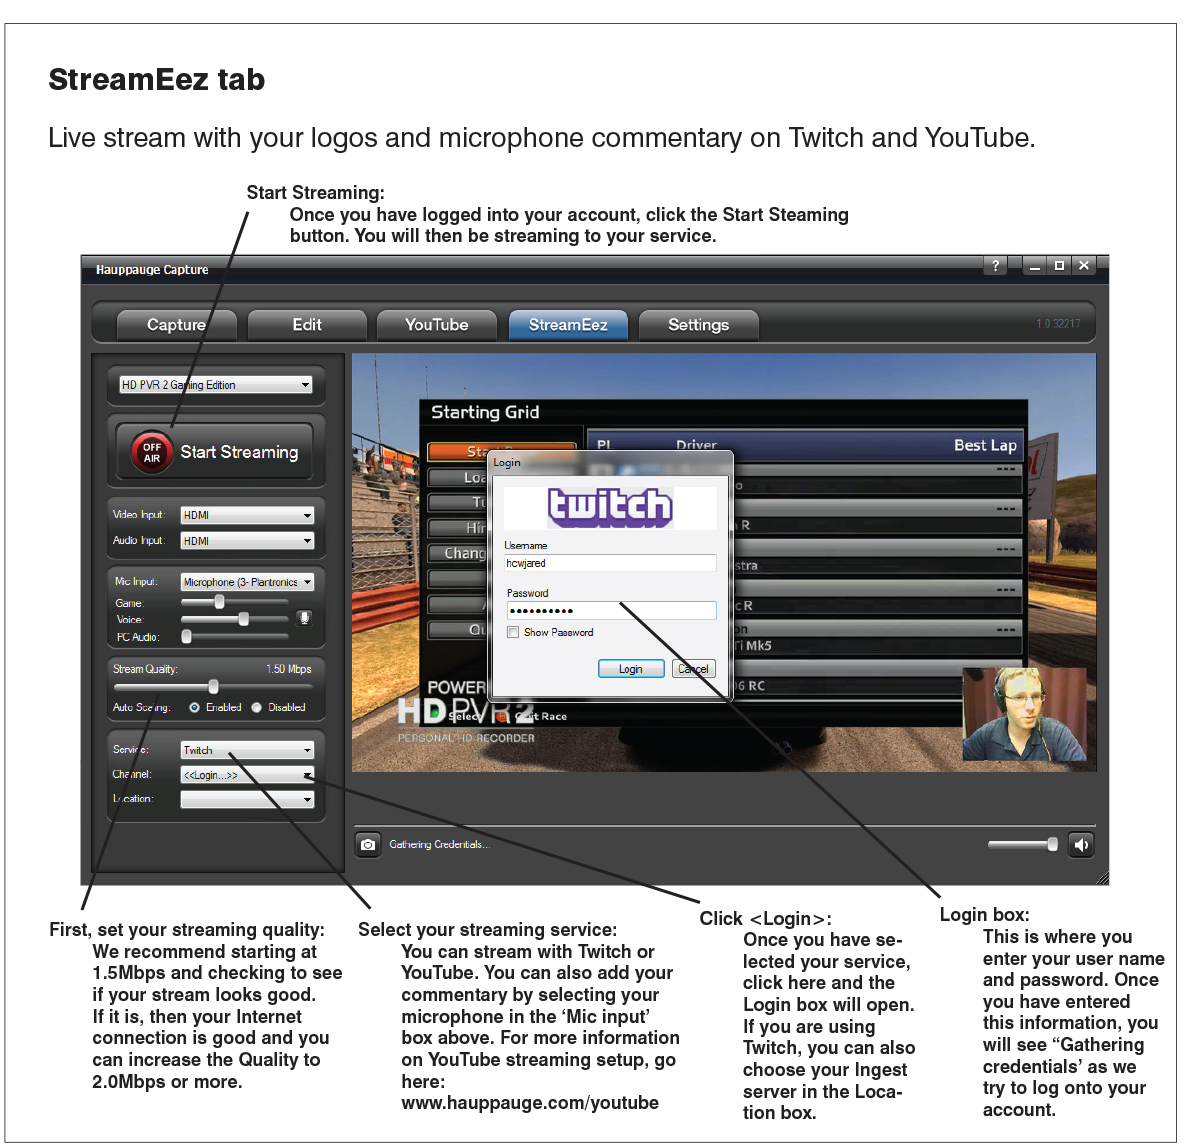
Hauppauge Capture StreamEez Tab
click to enlarge
Hauppauge Capture video tutorials
How to connect HD PVR 2 to a cable or satellite TV box
Video setup guide to YouTube Live
Lesson 1: Which HD PVR Is Right For You?
Lesson 2: Recording and Editing Footage with Hauppauge Capture
Lesson 3: How to Add Commentary and FaceCam with Hauppauge Capture
Lesson 4: How to Add a Personal Logo with Hauppauge Capture
Lesson 5: How to Upload to YouTube with Hauppauge Capture
Recording and Editing Footage with Hauppauge Capture
Adding your logo with the personal logo in Hauppauge Capture
How to add commentary and facecam with Hauppauge Capture
Upload videos to YouTube with Hauppauge Capture